今天了解一下SpringBoot如何与我们最常用的ORM框架Mybatis整合。
一、
需要在pom.xml文件里加入mybatis的依赖
org.mybatis.spring.boot mybatis-spring-boot-starter 1.3.2
二、
需要在application.properties文件里加关于mybatis的配置
#mybatis配置 mybatis.mapper-locations=classpath:mapper/*.xml ------意思是mapper文件在classpath下的mapper里 mybatis.type-aliases-package=com.renruibin.springbootmybatis.pojo -------设置自定义的Pojo别名为首写字母小写的pojo
#数据源配置 spring.datasource.url=jdbc:mysql://localhost:3306/springbootmybatis spring.datasource.driver-class-name=com.mysql.jdbc.Driver spring.datasource.username=root spring.datasource.password=rrb
三、
使用Ant,达到自动创建默认的Mybatis代码和生成表,需要添加以下文件,目录结构为:
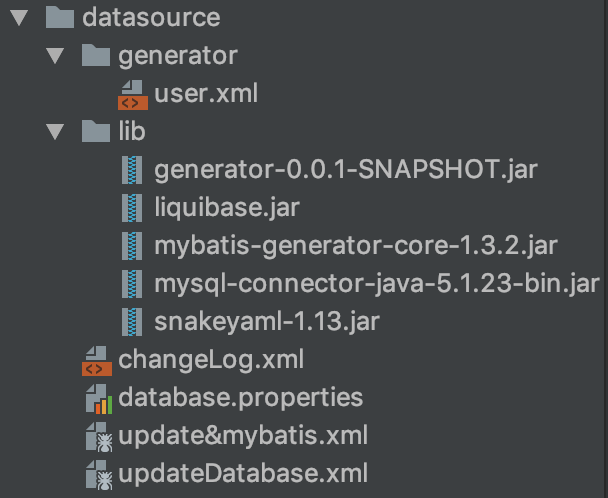
1、user.xml,这是要自动生成代码的一些配置
javaModelGenerator:配置自动生成的pojo所在的位置
sqlMapGenerator:配置自动生成的mapper.xml文件所在的位置
javaClientGenerator:配置自动生成的mapper.java文件所在的位置
2、changleLog.xml,这是要自动生成表或者修改表结构的一些配置
3、database.properties,这是数据源的一些配置
database.driver=com.mysql.jdbc.Driver database.url=jdbc\:mysql\://127.0.0.1\:3306/springbootmybatis?useUnicode\=true&characterEncoding\=UTF-8 database.username=root database.password=rrb
4、update&mybatis.xml,这是ant自动生成代码的配置
5、updateDatabase.xml,这是ant自动生成表的配置<project name="updateDatabase" default="updateDatabase">
database.url not set database.username not set database.password not set
四、
建立dao、service、controller,目录如下:
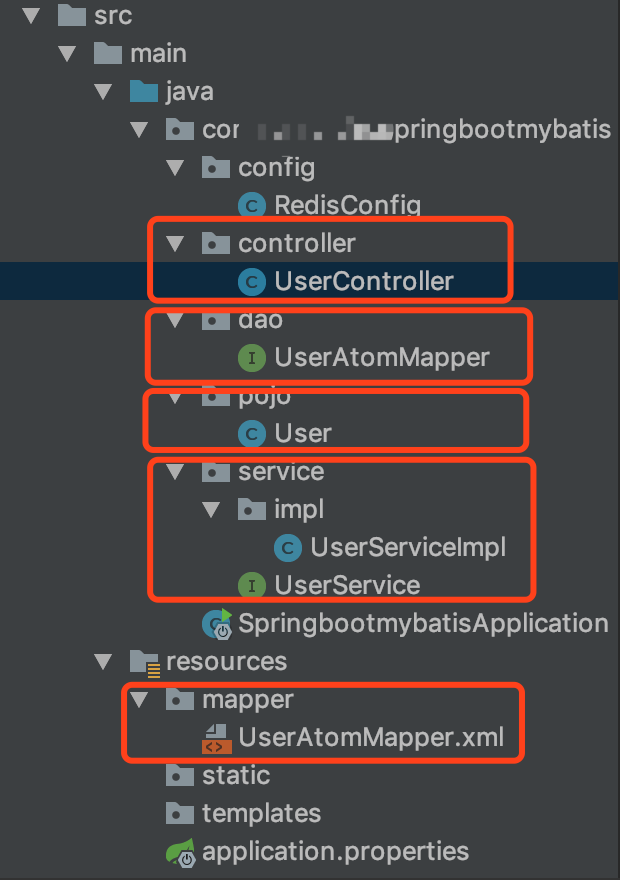
1、先看一下dao层的代码是如何编写的吧
@Mapper public interface UserAtomMapper { List finaAll(); } @Mapper这个注解很关键,之前用的@Repository注解,但是与springboot整合之后,这个注解就不能用了,只有@Mapper注解的时候,才可以把这个类注入到service里。 2、看一下mapper层的xml文件是如何编写的
3、看一下service层的代码
@Service public class UserServiceImpl implements UserService { @Autowired private UserAtomMapper userAtomMapper; @Override public List findAll() { return userAtomMapper.finaAll(); } 4、看一下controller层的代码
@RestController public class UserController { @Autowired private UserService userService; /** * 获取所有的用户 * @return */ @RequestMapping(value = "findAll",method = RequestMethod.GET) public List findAll(){ return userService.findAll(); } } 使用了注解@RestController,这个注解相当于两个注解,@Controller和@ResponseBody 五、
接下来可以测试,在浏览器输入localhost:8080/findAll
